Until the availability of the HTML5 video element, all the video we have ever watched within a browser has been played through third party browser plugins. First there was RealPlayer, then Windows Media Player and QuickTime, and most recently Flash (which is currently the dominant plugin that plays the majority of Internet video).
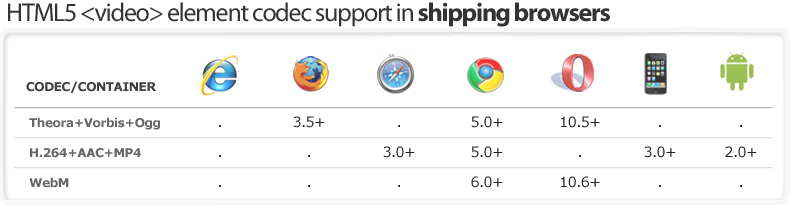
Within the HTML5 specifications there is a new standard defined to embed and play video within a web page, WITHOUT the need for a third party plugin using a <video> element. Sounds easy, right? There is a catch…There is currently not a single video format that works in all HTML5 browsers and we believe this is not going to change anytime soon.
For a professional HTML5 video implementation we recommend encoding your video into the following formats for maximum compatibility across HTML5 browsers:
- Flash VP6 in a .flv format (Chose the “Flix VP6” preset from the encoding.com presets)
- H.264(Baseline) in a .mp4 container. (Chose the “Flash 9 H.264” from the encoding.com presets)
- VP8/WEBM in a .webm container. (Chose “WEBM” from the encoding.com presets)
- Theroa/Vorbis in a .ogv container. (Chose “Theora” from the encoding.com presets)
HTML5 Video markup example (single video)
HTML5 gives you two ways to embed and play video within a web page. Both of them involve the <video> element. If you only have one video file, you can simply link to it in a src attribute. This is exactly like the image tag that we all know and love <img src=”…”> tag.
For example: <video src=”myvideo.ogv”></video>
As with the <img> tag, you should always include width and height attributes in your <video> tags. The width and height attributes should be the same as the dimensions you specified during the encoding process. If one dimension of the video is a little smaller than the width or height the browser will center the video inside the box defined by the <video> tag, rather than stretching of squishing the video.
For example: <video src=”myvideo.webm” width=”640″ height=”480″></video>
By default, the <video> element will not display the video of player controls. You can create your own controls with HTML, CSS, and JavaScript. The <video> element supports the following method, play and pause , currentTime , volume , muted
For example: <video src=”myvideo.webm” width=”640″ height=”480″ controls></video>
HTML5 video also supports preload and autoplay. The preload attribute tells the browser that you would like it to start downloading the video as soon the page loads. If you want o minimize bandwidth on your pages and ensure that a video is not downloaded unless the user actually watches it you can set preload to none.
For example: <video src=”myvideo.webm” width=”640″ height=”480″ preload></video> or <video src=”myvideo2.webm” width=”640″ height=”480″ preload=”none”></video>
The autoplay attribute will not only start downloading the video when the page loads but also start playing the video (without the user clicking the play button)
For example: <video src=”myvideo2.webm” width=”640″ height=”480″ autoplay></video>
HTML5 Video markup example (multiple videos)
Since each browser supports a different video format, (see our recommendations above) it is important to create a video element that supports the multiple video formats you have prepared for each browser. Each <video> element can container multiple <source> elements and the browser will go down the list of video sources in the order they are listed and play the first one it is able to play. This however is a waste of time and bandwidth and creates a bad user experience so it is important to tell the browser which type of video is which with the <source> element so each browser will only play the video it supports.
For example:
<video width=”640″ height=”480″ controls>
<source src=”myvideo.mp4″ type='video/mp4; codecs=”avc1.42E01E, mp4a.40.2″'>
<source src=”myvideo.webm” type='video/webm; codecs=”vp8, vorbis”'>
<source src=”myvideo.ogv” type='video/ogg; codecs=”theora, vorbis”'> </video>
NOTE: We recommend you always list the .mp4 H.264 file in your list first for compatibility with old version of iOS (older than 4)
The type attribute containers three pieces of information: MIME type, video codec, audio codec. So in the example above for the video myvideo.mp4. The MIME type is video/mp4, the video codec is “avc1.42E01E” and the audio codes is “mp4a.40.2”
NOTE: The type values have to be included in quotation marks so you need to add another type of quotation mark to surround the entire value. For example: type='video/ogg; codecs=”theora, vorbis”'
NOTE: Encoding.com will automatically set the correct MIME type for your output files. If you are using Amazon S3 as an output destination you can set custom MIME types. Visit this article for more details.


 (17 votes, average: 3.76 out of 5)